a31 October 2012

New records

Action shot I took with a very fast shutter speed (1/2500 s) to freeze this amazing, and somewhat unrealistic, moment.
October was a really great month for this blog. It was 11th month in a row when both page-views and unique visitor grew but it also reached a few milestones. Here they are:
  • More than 10k page-views in a month (12.5k to be exact),
  • More than 4k unique visits in a month,
  • More than 50k page-views total.
Maybe this statistics aren't really exciting compared to other photo related blogs but what I like is that from month to month the growth speed increases. Moreover from the above you can see that this month's visits make 1/4th of all visits. Not bad.

All these would be impossible without you, your comments, likes (on Facebook and Google+) and shares. Thank you and I hope you will visit me next month as well :)

Continue reading for more details »

a30 October 2012

Hut on the beach

I really liked that composition when taking a shot: a hut on a dune against the colourful sky. Very simple yet beautiful.

EXIF data:
Camera: Canon 50D
Lens: Canon 24-105 f/4 L IS USM
Focal length: 50
Aperture: f/11.0
Exposure time: 1/2 s
ISO: 100
Number of exposures: 5
E.V. Step: 1.5 EV
Flash used: no
Tripod used: yes
Filters used: no
Software: Magic Lantern, Photomatix Pro 4.2, Lightroom 4.1, Photoshop CS5

Continue reading for more details »

a29 October 2012

Beautiful sunset

It was one of the most beautiful sunsets I've ever seen. So I was really upset that I didn't take a tripod with me (I planned shooting something not requiring tripod but stayed a little longer on the dunes). So what I did was taking 5 exposures (all hand held!) with help of Magic Lantern. Of course there were issues with alignment but luckily Photomatix Pro handled them perfectly :)

EXIF data:
Camera: Canon 5D MK II
Lens: Canon 24 f/1.4 L IS USM II
Focal length: 24
Aperture: f/7.1
Exposure time: 1/800 s
ISO: 400
Number of exposures: 5
E.V. Step: 1.5 EV
Flash used: no
Tripod: no
Filters: no
Software: Magic Lantern, Photomatix Pro 4.2, Lightroom 4.1, Photoshop CS5

Continue reading for more details »

a28 October 2012

The Red Mountain

Although the Red Mountain is somewhere else I think the one in the photo above also deserves this name. I took this photo in the Timanfaya National Park on the Lanzarote island.

EXIF data:
Camera: Canon 5D MK II
Lens: Canon 24-105 f/4 L IS USM
Focal length: 70 mm
Aperture: f/8
Exposure time: 1/400 s ("middle" exposure)
ISO: 400
Number of exposures: 3
E.V. Step: 2.0 E.V.
Flash used: no
Tripod: no
Filters: circular polarizing filter
Software: Magic Lantern, Photomatix Pro 4.2.4, Lightroom 4.1, Photoshop CS5

Continue reading for more details »

a27 October 2012

Tutorial: getting realistic results in Photomatix Pro

"HDR is about light, not about colour" - I really like this quote (although I'm not sure who said/wrote it first) and I would like to use it as a summary to this post. In this short tutorial I would like to share my point of view on achieving realistic looking HDR photos. Many people asked me recently how they can get realistic results from Photomatix. As I use Photomatix on a daily basis and also try to achieve realistic looking results I think I can help.

One of the best things I learnt about HDR and tone-mapping in the recent years is that it's the beginning of the process of developing a photo, not the final step. As you might know (if not take a look at my tutorial about HDR) HDR which stays for High Dynamic Range means that a photo has much more information about luminosity than a Low Dynamic Range photo (like a single JPG, TIFF or even RAW file). Luminosity is a characteristic we relate to light, not colour. It does have nothing with colour temperature or saturation.

But you probably also know that it isn't possible to display a HDR photo on a typical monitor without a special conversion step known as tone-mapping. That said what you should primarily use tone-mapping for is making sure that details both in highlights and shadows are preserved. You don't need to care about colour temperature or saturation at this stage that much.

Also if you throw out any details in either highlights or shadows you are questioning sense of using HDR for that particular shot. Why? Because you could as well use a single exposure that lacks those details and you would end up with similar result. Might seem weird but after tone-mapping your photo isn't HDR anymore - it's a typical low dynamic range image.

Therefore, what I do most of the time recently is to use Default preset in Photomatix Pro 4. You might find it boring, colorless etc. Yes, it's quite boring compared to some other presets (especially Grunge or Creative) but it has strong advantage of restoring details perfectly. I do make a few minor changes to it:
  • I lower White Point setting value to much closer to 0 (look at the histogram when doing this because what you should achieve is avoiding highlights clipping) to make sure highlights aren't getting clipped
  • I also increase Detail Contrast (often all the way to 10.0) to enhance details as this setting increases local contrast.
  • I also adjust Lighting Adjustments to get as realistic results as possible (mainly to get rid of any halo arifacts). I use different values depending on a photo so I'm not giving any good or bad values here.
I sometimes also play with Luminosity and Gamma. If you do so, make sure neither highlights nor shadows are getting clipped.

After that I usually hit Process button and end up with a low-contrast image like the one below:
Yes, it's boring but note how well highlights and shadows are preserved and how much detail this image has. Note that there are also no halo artifacts and that in general this image is very realistic (nothing surreal). So it's a great starting point and it doesn't require a lot of work.

Although this image might seem completely different from the one from the beginning of this post it's the same image with 2 more adjustments. After processing in Photomatix I opened it in Photoshop and added some contrast and colours using Topaz Adjust 5 plug-in. I used Brilliant Warm preset with a few small tweaks. And voila! Alternatively to using Topaz you can use Adjustment Layers (especially Hue/Saturation and Vibrance).

Continue reading for more details »

a26 October 2012

A lonely wind mill

Windmill on Fuerteventura
Click on the photo to view it in large size on black background.
Wind mills were always very high on my list of subjects I would like to photograph. However, there aren't many of them in Poland so I didn't have a chance to take any photo of them. I finally did capture one during my recent stay on the Fuerteventura Island. I know there are plenty of wind mills in the continental part of Spain but there are just a few left on this island. One of them, which I found near El Cotillo, you can see above.

EXIF data:
Camera: Canon 5D MK II
Lens: Canon 24-105 f/4 L IS USM
Focal length: 24 mm
Aperture: f/8
Exposure time: 1/400 s ("middle" exposure)
ISO: 400
Number of exposures: 3
E.V. Step: 2.0 E.V.
Flash used: no
Tripod: no
Filters: circular polarizing filter
Software: Magic Lantern, Photomatix Pro 4.2.4, Lightroom 4.1, Photoshop CS5

Continue reading for more details »

a25 October 2012

New IR and a few milestones reached today

I'm really happy because today I reached two milestones for my photos and blog (yes, I reached both on the same day!). First of all I reached 100.000 views on 500px portal (here is the link to my stream). It isn't that much compared to some 500px best photographers but it still means a lot to me. The second "achievement" is that my blog reached 10.000 page views in a single month (and there are still a few days till the end of October). Of course I would be even happier if it was about visits but still quite a good result for a blog which in March this year had something around 300 views (yes only three hundred!).

Now a few words about the photo from this post. It is an infrared photography I took on the Fuerteventura Island. If you aren't familiar with infrared photography head over to my tutorial about it. It was quite windy so I decided to use faster shutter speeds (if 3 seconds can called be that way...) what required increasing the ISO and using quite fast aperture as well. This in turned resulted in rather shallow depth of field. Although f/6.3 for a focal length of 24 mm is quite much note how close to the foreground I was. So what I did was to take several photos with different points of focus and to stack them (I wrote tutorial about it as well). As this photo has some nice textures, details and light & shadows play I decided to use black & white conversion for it.

EXIF data:
Camera: Canon 5D MK II
Lens: Canon 24-105 f/4 L IS USM
Focal length: 24
Aperture: f/6.3
Exposure time: 3.2 s
ISO: 1600
Number of exposures: 1
E.V. Step: n/a
Flash used: no
Tripod: yes
Filters: Hoya IR R72
Software: Lightroom 4.1, Photoshop CS5

Continue reading for more details »

a24 October 2012

Fog at sunrise

Just yesterday I shared a tutorial on making water look smooth in your photos. Today I would like to upload another photo showing this effect. I really like how the water turned out here. Near the shore it looks like fog you can walk into.

EXIF data:
Camera: Canon 50D
Lens: Canon 10-22 mm f/3.5-4.5 USM
Focal length: 10 mm
Aperture: f/11
Exposure time: 60 s
ISO: 200
Number of exposures: 1
E.V. Step: n/a
Flash used: no
Tripod: yes
Filters: ND8
Software: Magic Lantern, Lightroom 4.1, Photoshop CS5

Continue reading for more details »

a23 October 2012

Tutorial: smooth water effect

Silky smooth water
This is example of technique described in this tutorial - long exposure photograph taken at sunset on Fuerteventura.


First of all I would like to thank for all the positive feedback I'm recently receiving on my tutorials/tips/photos here, on Facebook, Google+ and by e-mail. It's really kind of you and keeps me motivate. I would also really appreciate it if you could maybe share the links to your favourite tutorials/photos with your friends or colleagues - the more readers this blog will have, the more motivated I will be (read: the more tutorials I will write :) ).

Today I would like to share my ideas on creating a smooth water effect. If you're into landscape photography you're probably familiar with photos where water looks very smooth, silky or like fog. If you're not I'm posting one such a photo with this post.

Although many people claim that such photos are photoshopped in fact they aren't (or at least in most cases they aren't). They are created mostly in the camera with skill and patience.

Equipment

Basically it is a photography technique that requires very little work in post (although I will write a few words about that too). You will need:
  • camera that allows setting bulb exposure (by this I mean exposures longer than 30 seconds) - this technique requires shooting exposures that long,
  • steady tripod - because of very long exposures,
  • release shutter release (or Magic Lantern if you use Canon DSLR) - same as above,
  • neutral density filter - I'm using grey filter because it's neutral (i.e. it doesn't change colours). You can also experiment with colour density filters for achieving particular look. Neutral density filter basically stops some light from reaching the sensor,
  • gradual neutral density filter (optional).

Location

First of all, as always scan your location before taking any photos. The reason for this is that it's easiest to get good results either just before sunrise or just after sunset when it's quite dark (it's easier to get longer exposures during that time of day). Looking for a location when it's dark is rather risky and also you might miss the best places.

Try to find a place where there are some interesting rocks (or bridge, or jetty) which will serve as a foreground element. Another good idea is to shoot during the high-tide. The sea is more rough during it, there are some water splashes. Basically there is a lot of movement so it will be easier to blur it using a long exposure.

Taking a shot

The key to achieving smooth water effect, as I already mentioned, is using a long exposure. In a photo above I used 100 seconds exposure. Despite the fact the sea was really rough with a lot of waves and billows the image appears as very calm and silent. That's how the long exposure works in this case - it blurs the waves by smoothing their motion. So depending on the waves you might need to set your exposure from 30 seconds to something around 120. Sometimes shorter exposures will do, sometimes longer will be necessary. It really depends on the conditions.

Of course using such a long exposure even in a dim light will result in a blown out photo. That's why neutral density filter is necessary. Depending on the conditions and effect you want to achieve you might choose different strength of the filter. For the above photo I used ND400 (which is a 9 stop filter) but on the other day when I was shooting even earlier before sunrise I was using ND8 (3 stops of light). Even when using filter you will need to shoot with the lowest ISO possible and some small aperture (I used f/22).

Also during sunrise and sunset the sky is usually much brighter than the water surface. Even when using small aperture, low ISO and neutral density filter the sky might still turn out blown-out. You can approach this problem in two different ways:
  1. take at least two exposures: one exposed for the sky and one for the water and then either merge them manually or do an HDR out of them in Photomatix Pro.
  2. use gradual density filter to compensate for the difference in brightness between the sky and water. This is what I did in the photo above (although the other day I was taking a few exposures).

Post-processing

As I mentioned this effect doesn't require much work in post. Normally I do increase saturation a little bit, play a bit with contrast and sharpen it.

There is one more thing which is sometimes worth doing. If, despite using long exposure, you still have small waves visible in your picture you might try deceasing contrast in the water area. The easiest thing to achieve this is to add local adjustment in Lightroom or Adobe Camera Raw, paint over water area and decrease Clarity and/or Contrast. This should smooth the water a little bit. You might also use curves adjustment layer in Photoshop to achieve the same effect.

Continue reading for more details »

a22 October 2012

The Blue Cow

la vaca azul - the blue cow is the name of the cafe or restaurant in the El Cotillo town in the north of the Fuerteventura Island. The colors in this shot work very well for me (especially the blue tones of the doors and windows).

BTW as I recently get a lot of feedback regarding my photo tutorials (mostly positive!) I would like to let you know that I prepare a few other tutorials and they will become available on this blog in a few days to a few weeks (depending which one of course :) ).

EXIF data:
Camera: Canon 5D MK II
Lens: Canon 24-105 f/4 L IS USM
Focal length: 35 mm
Aperture: f/8
Exposure time: 1/250 s ("middle" exposure)
ISO: 400
Number of exposures: 3
E.V. Step: 2 E.V.
Flash used: no
Tripod: yes
Filters: circular polarizing filter
Software: Magic Lantern, Photomatix Pro 4.2.4, Lightroom 4.1, Photoshop CS5

Continue reading for more details »

a21 October 2012

Sunrise in black & white

I often do that: create both colour and black & white version of the same photo. Why? Because they do have so different feel. Black & white version is often more dramatic, you focus more on details and textures.

EXIF data:
Camera: Canon 5D MK II
Lens: Canon 24-105 f/4 L IS USM
Focal length: 24 mm
Aperture: f/11
Exposure time: 1/8 s ("middle" exposure)
ISO: 100
Number of exposures: 5
E.V. Step: 1.5 E.V.
Flash used: no
Tripod: yes
Filters: ND8 neutral density filter
Software: Magic Lantern, Photomatix Pro 4.2.4, Lightroom 4.1, Photoshop CS5

Continue reading for more details »

a20 October 2012

Tutorial: Getting extreme depth of field in landscape photos

I wanted to have focus both on the rocks in the foreground, rocks staying in water and on the islands in the background. This required taking photos at 4 different focal points (I took for 5 but one turned out to be not necessary).


Today I would like to share a short tip with you - how to get an extreme depth of field in your landscape photos.

Unless you're using a tilt-shift lens sooner or later you will be faced with a following problem. You want to take a landscape shot with some objects in the foreground (like rocks in the photo above, or leaves, or fallen tree trunk) but you want to have an extreme depth of field across your frame - you want both the foreground and the background to be sharp, to stay in focus. So what do you do to achieve this? Of course you do use a wide-angle lens as they are known for the fact it's easy to get huge depth of field, of course you set aperture to a value like f/16 or even more (like f/22 - note however that for some very small apertures image becomes blurred so it's not really a good idea to use apertures that small) and you take the shot. Then you discover that your photo isn't sharp enough. If you focused on the foreground it is very sharp but the background is blurry. If you focused on the background the foreground is a bit soft. If you focused somewhere between the foreground and the background neither of them is sharp enough. Not good...

The solution is simple although it requires an additional step. Instead of taking a single shot, you will need to take a few shots. First focus on the foreground, then on something a little further and finally on the background. Although it's best to do with manual focusing, you can also try using various auto focus points to achieve something similar. Also note that this technique is very popular amongst macro photographers who work with very shallow depth of field.

Continue reading for more details »

a19 October 2012

Colours in the desert

I already posted several photos from the Timanfaya National park here and here. Today I'm sharing one more. Although it's a desert area you can still find a lot of colours there - from yellows, oranges, different shades of brown to red. A really beautiful place.

EXIF data:
Camera: Canon 5D MK II
Lens: Canon 24-105 f/4 L IS USM
Focal length: 58 mm
Aperture: f/9.0
Exposure time: 1/320 s ("middle" exposure)
ISO: 329
Number of exposures: 3
E.V. Step: 2 E.V.
Flash used: no
Tripod: no
Filters: circular polarizing filter
Software: Photomatix Pro 4.2.4, Lightroom 4.1, Photoshop CS5

Continue reading for more details »

a18 October 2012

Sunrise shot and how I almost lost my gear

Another sunrise photo, I hope you aren't bored with them yet as there are still a few more to come :) actually plenty of them ;) So far this photo is the best I think. Both colours, light on the rocks and choice of shutter speed seem to work well. I think that I managed to show the scene the way I saw it.

A few minutes after taking this shot I almost lost my photography gear. I was shooting with Canon 5D MK II but also had Canon 50D with a 10-22 lens with me. As a bag was rather heavy I put it on the ground in a safe place. Well, at least I thought it was safe... As you see from the above photo the sea was rather rough. Out of a sudden pretty huge wave came in. I grabbed my tripod with 5D on it and ran back. Unfortunately I didn't make my way to the bag as the wave was faster. I was a bit wet but the bag with my Canon 50D was moved by a meter or so. Fortunately for me it really turned out to be weather- and waterproof :) not a single drop got inside. But the conclusion is that if you consider leaving part of your equipment when shooting near the sea, make sure that it is really safe.

EXIF data:
Camera: Canon 5D MK II
Lens: Canon 24-105 f/4 L IS USM
Focal length: 24 mm
Aperture: f/11
Exposure time: 1/8 s ("middle" exposure)
ISO: 100
Number of exposures: 5
E.V. Step: 1.5 E.V.
Flash used: no
Tripod: yes
Filters: ND8 neutral density filter
Software: Magic Lantern, Photomatix Pro 4.2.4, Lightroom 4.1, Photoshop CS5

Continue reading for more details »

a17 October 2012

Beach on Lanzarote Island

Today another photo from the Canary Islands - one of the beaches on the Lanzarote Island.

EXIF data:
Camera: Canon 5D MK II
Lens: Canon 24-105 f/4 L IS USM
Focal length: 24 mm
Aperture: f/8.0
Exposure time: 1/60 s ("middle" exposure)
ISO: 100
Number of exposures: 3
E.V. Step: 2 E.V.
Flash used: no
Tripod: no
Filters: circular polarizing filter
Software: Photomatix Pro 4.2.4, Lightroom 4.1, Photoshop CS5

Continue reading for more details »

a16 October 2012

Land of volcanoes

Today another photo from the Timanfaya National Park. You can view previous one here. I really like the light & shadows play created by the clouds here.

EXIF data:
Camera: Canon 5D MK II
Lens: Canon 24-105 f/4 L IS USM
Focal length: 24 mm
Aperture: f/8.0
Exposure time: 1/200 s ("middle" exposure)
ISO: 400
Number of exposures: 3
E.V. Step: 2 E.V.
Flash used: no
Tripod: no
Filters: circular polarizing filter
Software: Photomatix Pro 4.2.4, Lightroom 4.1, Photoshop CS5

Continue reading for more details »

a15 October 2012

Sunset during low tide

I love shooting landscapes, I love shooting sunsets, I love shooting reflections. This photo, taken on the Fuerteventura Island, has all 3 of them (plus some great colours). The clouds had amazing pink colour (the sun was to the left of the frame) and as it was low tide they reflected in the wet sand. It was a really beautiful view.

EXIF data:
Camera: Canon 50D
Lens: Canon 24-105 f/4 L IS USM
Focal length: 24 mm
Aperture: f/11
Exposure time: 1/2 s ("middle" exposure)
ISO: 100
Number of exposures: 5
E.V. Step: 1.5 E.V.
Flash used: no
Tripod: yes
Filters: no
Software: Magic Lantern, Photomatix Pro 4.2.4, Lightroom 4.1, Photoshop CS5

Continue reading for more details »

a14 October 2012

Walk in the forest

Click on the photo to view it in large size on black background.
Today I'll give you a break from the landscape photos and I'm uploading something completely different - a photo from the shoot with my sister and her horse Ghost (Duszek). I was using 24 mm lens most of the shoot because I wanted to fit both my sister and the horse in the frame. I also wanted to blur the background a little bit so I chose f/1.4. The most difficult part for me was getting so close to the horse (and I was really close as I was using a wide-angle lens) as I know it's quite easy to scare it (for that reason I decided not to use flash). But all went well :) And I like the result as well.

EXIF data:
Camera: Canon 5D MK II
Lens: Canon 24 f/1.4 L USM
Focal length: 24 mm
Aperture: f/1.4
Exposure time: 1/125 s
ISO: 200
Number of exposures: 1
E.V. Step: n/a
Flash used: no
Tripod: no
Filters: no
Software: Lightroom 4.1, Photoshop CS5

Continue reading for more details »

a13 October 2012

Silhouette

Today a simple silhouette photo I took recently.

EXIF data:
Camera: Canon 5D MK II
Lens: Canon 24-105 f/4 L IS USM
Focal length: 105 mm
Aperture: f/8.0
Exposure time: 1/3200
ISO: 100
Number of exposures: 1
E.V. Step: n/a
Flash used: no
Tripod: no
Filters: no
Software: Lightroom 4.1, Photoshop CS5

Continue reading for more details »

a12 October 2012

Tutorial: How to take photos of the stars - part 2. Star trails

Note: this is part 2 of the tutorial. Click here to read part 1. You can also proceed to part 3 by clicking here.
Star trails photo
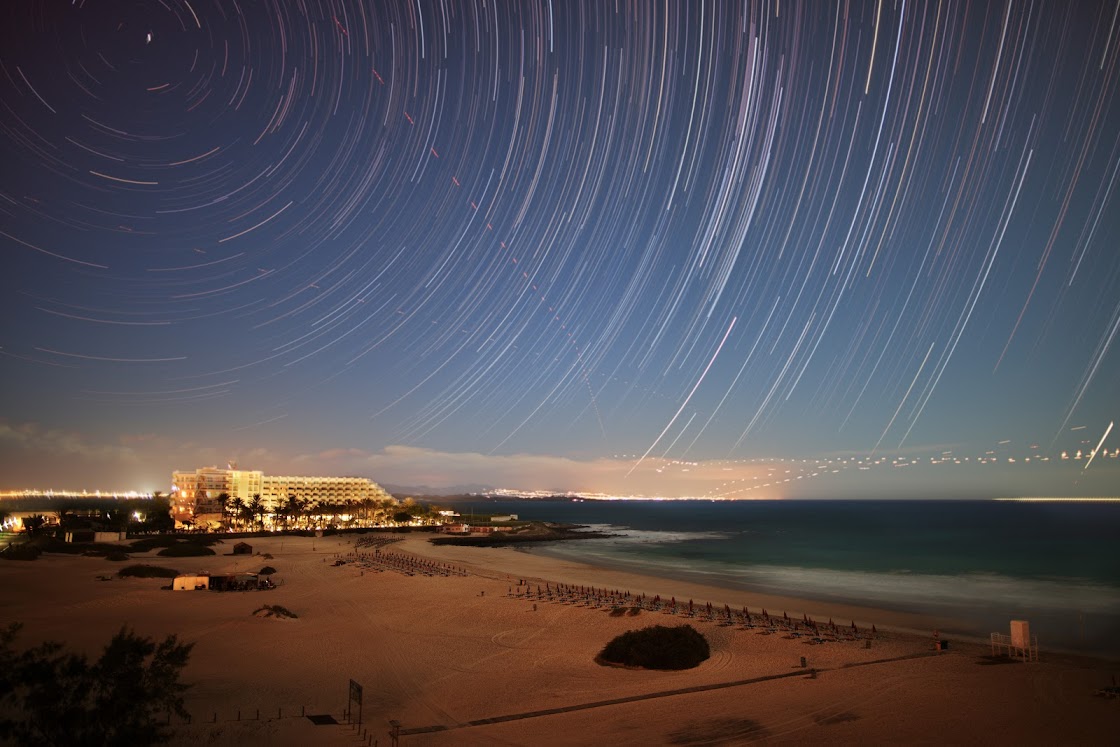
I took this photo on the Fuerteventura Island. I used a total of 493 photos which I stacked using technique described in this tutorial. Each photo was taken with Canon 5D MK II, 24 mm at f/1.4, ISO 800 and with 2 seconds exposure. Interval between the shots was 10 seconds. This way I covered almost 2 hours. I used Magic Lantern to capture all photos.
Welcome to part 2 of my tutorial about taking astrophotos. First part became quite popular in the last few days (thank you Magic Lantern for retweeting me!) and it already reached Top 10 amongst all my posts. If you haven't read it, I recommend you do before reading further (here it is) because I detailed things like necessary equipment, researching location etc. in it. Also in the 1st part I was describing technique to create photos of the sharp stars or the Milky Way galaxy.

Introduction

Today I will write a few words about so called "star trails". If you're familiar with a long-exposure effect known as light trails where lights of cars or other light sources are visible in forms of long one colour trails or streaks you might expect that star trails is also about the motion of the light sources. Indeed. In this case we will deal with the apparent movement of stars. The main difference is that to take a typical "light trails" photo exposure of 10 - 120 seconds will do most of the time. For star trails photography you need exposures of 10 minutes and preferably much longer (1 to a few hours) because apparent movement of stars is much slower and harder to notice. And that's the problem for a number of reasons:
  • long exposures can cause more noise to appear. There are several ways of dealing with noise caused by a long exposure (eg. taking dark frames) but none of them will remove all noise,
  • battery would drain pretty quickly and it may even not suffice for taking a single exposure (especially if the exposure would be very long and the temperatures would be very low),
  • even if you stop down your lens to let's say f/22, use ISO 100 (or even faster) you won't be able to use long enough exposures. Why? Because there are other light sources like distant cities or the moon which are much brighter than stars and would be properly exposed long before the stars making your photo overexposed (or at least parts of it). Other problem with using f/22 and ISO 100 combination is that your stars trails would be very faint. As you remember to capture stars properly it is recommended to shoot wide open to let even the faintest light - light of those distant start.

Continue reading for more details »

a11 October 2012

Sunset panorama

Today I'm uploading one of the panoramas I took during my stay on the Fuerteventura. It was a gorgeous sunset and I hope the photo shows it.

One more thing. It seems that Facebook changed their algorithms recently what causes news from fanpages to appear less frequently in user's feed and therefore making it much harder to reach broad audience. Of course you can pay to reach more viewers/readers but I think it's a bit against the idea of social networking (I only want people to see my photos not to sell or advertise them there). So I'm not paying. Not a single cent. Therefore I will probably spend more time on Google+ from now on. Here is my profile, if you like to follow me there.

EXIF data for the panorama photo:
Camera: Canon 5D MK II
Lens: Canon 24 f/1.4 L USM
Focal length: 24 mm
Aperture: f/7.1
Exposure time: 1/500
ISO: 400
Number of exposures: 19
E.V. Step: n/a
Flash used: no
Tripod: no
Filters: no
Software: Lightroom 4.1, Photoshop CS5

Continue reading for more details »

a10 October 2012

Timanfaya National Park

Timanfaya park on Lanzarote
Click on the photo to view it in large size on black background.
Today a photo from the Timanfaya National Park (Parque Nacional de Timanfaya) on the Lanzarote Island - one of the most amazing places I've ever seen despite it's nothing more than sand, lava rocks and volcanoes. No animals, nothing green.
It was formed by around 100 volcanic eruptions which took place between 1730 and 1736. There was one more eruption which took place a century later - in 1824. Even though now the volcanoes are calm it doesn't need to be that way for ever as this region is still very active. For instance the stones around 10 cm below the ground have temperature of 100 degree centigrade. At 10 meters below the ground the temperature is... 600 degree centigrade! Sounds unbelievable but that's the truth (I had dubious pleasure to test it myself).
When you go through the park you can watch amazing moon-like landscape. What is quite unfortunate is that you can't really walk in this park as it would be very dangerous as there are plenty of hidden traps there (crevasses and holes in the lava rocks especially). Therefore most of the time you will spend in a bus which travels on quite a safe road which was built in the 70's. But still it's an amazing experience and a great place to see. It resembles the Moon so much that first Apollo mission astronauts were shown photos from the Lanzarote Island to familiarize them with what they were to see.

I took this shot from the bust actually when it stopped. As I couldn't use a tripod I shot 3 exposures.

EXIF data:
Camera: Canon 5D MK II
Lens: Canon 24-105 f/4 L IS USM
Focal length: 32 mm
Aperture: f/8.0
Exposure time: 1/40 s ("middle" exposure)
ISO: 125
Number of exposures: 3
E.V. Step: 2 E.V.
Flash used: no
Tripod: no
Filters: circular polarizing filter
Software: Photomatix Pro 4.2.4, Lightroom 4.1, Photoshop CS5

Continue reading for more details »

a9 October 2012

Fuerteventura sunrise in black & white

Today I want to share one more sunrise photo with you but this time in black & white. The waves were quite high and rough making whole scene rather dramatic (although I also have a colour version of this photo which has its advantages and I will share it later).

EXIF data:
Camera: Canon 5D MK II
Lens: Canon 24-105 f/4 L IS USM
Focal length: 24 mm
Aperture: f/13
Exposure time: 0.6 s ("middle" exposure)
ISO: 100
Number of exposures: 5
E.V. Step: 1.5 E.V.
Flash used: no
Tripod: yes
Filters: ND8 neutral density filter.
Software: Photomatix Pro 4.2.4, Lightroom 4.1, Photoshop CS5

Continue reading for more details »

a8 October 2012

Tutorial: How to take photos of the stars - part 1

Note: this is part 1 of the tutorial. Click here to read part 2. You can also proceed to part 3 by clicking here.

Milky Way over Fuerteventura Island
So I'm finally writing what I promised a few days ago - a tutorial on taking photos of the starry skies. I won't describe professional astrophotography technique as we won't use telescope of any sort. I decided to break this tutorial into a few parts, today is the first one.

Photos of the starry sky typically fall into one of the two categories:
  • stars where the stars and the galaxy are sharp,
  • star trails where the the apparent motion of the stars is captured.
First part of this tutorial will deal with the first category, second part with the star trails and the last part with post-processing techniques and ideas.

Equipment

First of all I need to write a few words about necessary equipment. You will basically need 3 things:
  • fast wide-angle lens - the reason you will need wide angle lens is because the longer the focal range, the shorter the time in which the stars are points - i.e. don't become star trails. With a 50 mm lens (35 mm equivalent) you will have a maximum of around 30 - 40 seconds before the stars become blurry. Therefore the wider the lens, the more time you will have. Why the lens should be fast? I think that this one is quite obvious - the faster the lens the shorter time will be necessary to correctly expose the photo (so instead of 40 seconds you will be able to use 25 seconds for instance).
    Note that most of the time you will shoot wide open (more about this later) so it really makes a difference whether you use 16-35 f/2.8 lens or 17-40 f/4 lens. For all my recent astrophotos I used Canon 24 mm f/1.4 at f/1.4 which is one of the fastest wide-angle lens available on the market. As you may notice I was using exposures of 10 seconds. This means that when shooting at f/2.8 I would need to use 40 seconds exposures! So the lens makes a terrific difference. Please note that if you have f/3.5 or f/4 lens you can still take good photos but you will need to use longer exposures.
  • steady tripod - this one is obvious I guess. You will shoot long exposures so any shake due to the wind or shutter being released might ruin the photo.
  • remote release - same as above - this should be pretty clear. However, as described in one of my previous posts I don't use remote release at all recently. What I do instead is to use bulb feature of the Magic Lantern + 2 seconds delay.
One thing which might be obvious or not but will definitely help is a torchlight. It will make reaching the destination, setting up a tripod and a camera a lot easier and safer (there is nothing worse then falling to the ground with all equipment and breaking it).

Another useful accessory might be additional batteries. When you take long exposures and also it's quite cold (nights are usually much colder than days) the battery drains pretty quickly. So in order to have enough power for a whole shoot make sure you have more than one battery and that all of them are fully charged.

Choosing location

Stars above beach on Fuerteventura
Click on the photo to view it in large size on black background.


Before you start taking any shots it is very import you research the location during the day. Otherwise it will be very difficult to come up with a good shot in the darkness. Try to choose locations far from any cities and towns because their lights might make the stars less visible (and will also appear above the horizon but this sometimes might look quite interesting). All kinds of desert and mountain locations should work pretty well (unless there is a lot of particles in the air as they greatly decrease visibility).

Continue reading for more details »

a7 October 2012

Have a rest under the stars

Yet another astro photo from me :) I really like the composition here, it makes this photo sort of surreal. You can see part of the Milky Way galaxy just over the beach umbrellas.

EXIF data:
Camera: Canon 5D MK II
Lens: Canon 24 f/1.4 L USM II
Focal length: 24 mm
Aperture: f/1.4
Exposure time: 10 s
ISO: 800
Number of exposures: 1
E.V. Step: n/a
Flash used: no
Tripod: yes
Filters: no
Software: Lightroom 4.1, Photoshop CS5

Continue reading for more details »

a6 October 2012

Sunrise on the Canary Islands

I took this sunrise photo on the Fuerteventura Island during one of the most beautiful sunrises I've ever seen (with a lot of oranges and pinks in the sky and greens and blues in the water). To be honest I'm not very enthusiastic on getting before 9 AM but I've heard so many good things about sunrises on the Canary Islands that I simply couldn't miss that very opportunity to photograph them at least a couple of times. However, I'm not sure if I really like this shot. Yes, I like the composition (especially with the reflection in the bottom right part), I like the clouds and the look of water but there is something I miss in this photo and I don't yet know - what.

Today I planned to write a tutorial about astrophotography but I was very short of time, so sorry - not today. Tomorrow I have a photo shoot planned so I might also not be able to do this but still expect it tomorrow evening (CET time) or on Monday in the worst case. Moreover I have plans to write 3 - 4 other tutorials in the following 2 weeks so expect some cool stuff here :)

EXIF data:
Camera: Canon 5D MK II
Lens: Canon 24-105 f/4 L IS USM
Focal length: 24 mm
Aperture: f/11
Exposure time: 0.6 s ("middle" exposure)
ISO: 100
Number of exposures: 7
E.V. Step: 1.5 E.V.
Flash used: no
Tripod: yes
Filters: no
Software: Photomatix Pro 4.2.4, Lightroom 4.1, Photoshop CS5

Continue reading for more details »

a5 October 2012

5 Reasons why I love Magic Lantern

5 reasons why Magic Lantern is great
This HDR photo was taken with help of Magic Lantern HDR bracketing feature. I took 7 photos which I then merged and tone-mapped in Photomatix Pro 4.2.4. Further editing was done in Lightroom 4.1 and Photoshop CS 5.


Do you own a Canon DSLR camera? If so, perhaps you have already heard of the Magic Lantern project. It's a free add-on you put on the memory card which greatly extends capabilities of the camera. It isn't a real firmware modification as when you take memory card out it will simply "disappear". Therefore it is safe to use. I've been using it for about 1.5 years now and can't really imagine working without it any more.

Although it offers dozens (hundreds?) of features there are a few which make me love it:
  1. HDR bracketing - this feature extends bracketing feature of the camera. Both my Canon 50D and Canon 5D MK II can normally take 3 auto-bracketed shots in 2 E.V. spacing. Not impressive. With Magic Lantern I can shoot unlimited number of photos even at 5 E.V. spacing (please note that in order to use more than 9 photos you will need to modify config files). There is even an option to automatically detect number of exposures needed to cover dynamic range of the scene. The only drawback for me is that there seems to be some delay between the shots involved (longer than with auto-bracketing feature) but other than that it's a really cool addition.
  2. L.V. display gain - this is yet another cool option if you shoot night photography, use ND400 neutral density filter or infrared filter. In all these cases it's almost impossible to use viewfinder to compose a shot and to focus as it's simply way too dark. Live View mode isn't helpful either as it is almost completely black. L.V. display gain is a feature which allows you to increase ISO of Live View to some crazy values. It's done digitally meaning there will be a lot of noise. But the best thing is that you can see a lot of things and to compose your photos! I used for example when taking this and this.
  3. Focus assisting features - there are a lot of focus assisting features in Magic Lantern (like trap focus, magic zoom, focus racking, etc.) but my favourite for now is focus peaking. When in Live View mode it displays a set of red (or green, or blue) dots where the focus is currently set. It makes manual focusing a lot easier and also a lot faster and precise.
  4. Intervalometer - yes, Magic Lantern has a really powerful intervalometer built-in. You can set a number of photos you want to take and time between them. It has even bulb-ramping built-in (meaning that it will try to set shutter speed in such a way that all photos are exposed in the same way)
  5. Bulb exposure - although both my cameras can use bulb exposure it has one drawback - I cannot set its length in the camera. Magic Lantern allows me to specify exact exposure time, no matter it's 15, 30, 90 seconds or a few minutes. Very cool :)
  6. Another cool feature is that you can combine these features together. For instance use intervalometer together with HDR bracketing to capture HDR timelapse. Fantastic!
But as I mentioned Magic Lantern offers dozens of features. Take a look at it especially if you're using your camera for filming as it offers a bunch of useful features (and even HDR video!).

Continue reading for more details »

a4 October 2012

Milky Way...

Milky Way over Fuerteventura


It's not just another version of my Milky Way shot. The previous one was a single exposure, this one is taken from 4, 10 seconds exposures. I needed both photos for different reasons (artistic and so on). As mentioned this one was created from 4 photos which I stacked in Photoshop and blended together. This revealed some extra details and also the structure of the Milky Way Galaxy. I plan to write a tutorial about exact technique later this week (probably tomorrow) so I'm not revealing any details now (let the tension rise ;) ). Hope you like it.

Continue reading for more details »

a3 October 2012

Falling into the water

Today I would like to post an action shot. The Canary Islands are visited by enthusiasts of all water sports (surfing, windsurfing, kitesurfing, swimming, yachting, scuba diving) so it's also a great place if you want to photograph these water activities. Although I'm not sport/action photographer I spent a few hours shooting water sports and here is one of the photos. I was observing this windsurfer for a while when he was making a turn and noticed that he had some problems with balance. So I aimed my camera at him and waited. After just a few seconds he felt into the water (of course he soon get out of it).

I used my crop Canon 50D body with 70-300 lens. On a crop 300 mm became equivalent of 480 mm on a full sensor so I could get really close. But I still regretted not having teleconverter or at least 400 mm lens with me to get even closer to the action :) To froze motion I used exposure of 1/1000 s.

EXIF data:
Camera: Canon 50D
Lens: Canon 70-300 f/4-5.6 L IS USM
Focal length: 300 mm
Aperture: f/5.6
Exposure time: 1/1000 s
ISO: 250
Number of exposures: 1
E.V. Step: n/a
Flash used: no
Tripod: no
Filters: no
Software: Lightroom 4.1, Photoshop CS5

Continue reading for more details »

a2 October 2012

Stormy sky at sunrise

Today a photo I took during sunrise. These clouds might look a bit unreal but they looked that way as there was severe storm over the islands you can see in the background (the nearer is known as Lobos, the further as - Lanzarote; I will have more photos of them later). Unfortunately I didn't manage to capture the lightning bolts (they would make this photo so much better... maybe even exceptional?) but I still quite like the result.

I used two filters on my lens in this case. The first one was neutral density filter to make the exposure a bit longer and make the water and clouds smoother. The second one I used was gradual density filter to balance the exposure a little bit. It was still rather dark but the clouds were much brighter so in order to have any details in the foreground this was necessary. I could also use HDR of course but I liked the strong dramatic contrast captured in a single exposure.

BTW as there was such a request this photo can be downloaded for free from the wallpapers section (which I didn't update for quite a long time).

EXIF data:
Camera: Canon 5D MK II
Lens: Canon 24-105 f/4 L IS USM
Focal length: 40 mm
Aperture: f/18
Exposure time: 5 s
ISO: 100
Number of exposures: 1
E.V. Step: n/a
Flash used: no
Tripod: yes
Filters: Hoya ND8 neutral density filter, gradual density filter
Software: Lightroom 4.1, Photoshop CS5

Continue reading for more details »

a1 October 2012

¡hola! and the Milky Way

¡hola! I was away for last two weeks as you may have noticed (as there were no new posts during that time). I came back just yesterday from the Fuerteventura Island (in the Canary Islands). Now I have a lot of new material (8700 photos to be exact) so it should keep me busy processing and uploading for a few weeks to follow. I took a wide variety of photos during that time - from astrophotos (as seen above), panoramas, sunrises/sunsets, architecture shots, sports/action and portraits. I also took a small number of infrared photos.

Now a few words about the photo you can see in this post blog. It shows the Milky Way galaxy as seen from the beach near the town of Corralejo. I was lucky to have no clouds (only just a few just above the horizon) and moon so I could easily see the galaxy even without taking a photo. For that reason I used rather short exposure (10 seconds) - this prevented stars from moving too much and producing blurry result.

Hope you like this.

EXIF data:
Camera: Canon 5D MK II
Lens: Canon 24 f/1.4 L USM II
Focal length: 24 mm
Aperture: f/1.4
Exposure time: 10 s
ISO: 800
Number of exposures: 1
E.V. Step: n/a
Flash used: no
Tripod: yes
Filters: no
Software: Lightroom 4.1, Photoshop CS5

Continue reading for more details »